Quick Start (old)
This tutorial will guide you through the process of deploying your first WeaveDB database and teach you how to interact with it.
Database Structure
WeaveDB is structured in a hierarchical manner, with each instance consisting of collections, each collection consisting of documents, and each document containing data fields and sub-collections.
Here's an illustration to help visualize this hierarchy:

As an example, let's say we define a collection called people, which could contain three documents, as shown below:
- people
  |
  |- Bob
  |  |
  |  |- name: "Bob"
  |  |- age: 20
  |
  |- Alice
  |  |
  |  |- name: "Alice"
  |  |- age: 30
  |
  |- Mike
     |
     |- name: "Mike"
     |- age: 40
Create a Database
To deploy a WeaveDB database, follow these steps:
Go to console.weavedb.dev.
Click on the Deploy WeaveDB button.

- Connect your wallet by clicking on Connect Owner Wallet. This wallet will serve as the admin account for configuring your database.

Set
SecuretoFalsefor the purposes of this tutorial. (Note: In a production setting, you should never setSecuretoFalse.)Finally, click on
Deploy DB Instance. Your WeaveDB database will be deployed to the mainnet in just a few seconds. You can view the transaction for the deployment by clicking on thecontractTxIdlink.

Query your Database
WeaveDB has a similar syntax to Firestore but simplified and expressed as a simple JSON array (e.g.["get", "people", "Bob"]). It is stored as a smart contract state and composed with other snippets. This is the key to the WeaveDB's advanced logic building using FPJSON, which is out of the scope of this tutorial.
To begin interacting with your WeaveDB database, sign in with your owner wallet by following these steps:
- Click on the
Sign Into DBbutton.

- Once signed in, you can execute queries in the bottom terminal.

When using the bottom terminal, try not to insert spaces in objects. Spaces are used to separate arguments so it will be parsed incorrectly, or wrap the object with ' or ".
Get Info
To get general information about your database:
getInfo
Add
To add a doc to a collection. The doc ID will be auto-generated:
# add : data_JSON : collection_name
add {name:"Bob",age:20} people
To set, update, delete, or upsert a doc, you can use the following commands followed by the new data, the collection name, and the doc name as arguments:
Set
# set : data_JSON : collection_name : doc_name
set {name:"Bob",age:20} people Bob
Update
# update : data_JSON : collection_name : doc_name
update {age:30} people Bob
Delete
# delete : collection_name : doc_name
delete people Bob
Upsert
# upsert : data_JSON : collection_name : doc_name
upsert {name:"Bob",age:20} people Bob
The differences between set, upsert, update are:
setwill reset the whole doc if the doc already exists.updatewill fail if the doc does not exist.upsertwill merge the new data with an existing doc or will add a new doc if it does not already exist.
Get
Let's add some people for the following tutorial:
set {name:"Bob",age:20} people Bob
set {name:"Alice",age:30} people Alice
set {name:"Mike",age:40} people Mike
To get a single doc:
get people Bob
To get the docs in a collection:
get people
Limit
To limit the number of docs returned:
get people 2
Where
To get docs where the age is 20:
get people ["age","==",20]
You can use the same operators as Firestore, which includes ==, !=, >, >=, <, <=, in, not-in, array-contains, and array-contains-any.
sort
To sort by age in descending order:
get people ["age","desc"]
Single field indexes are automatically generated. But to sort by more than 1 field, multi-field indexes need to be added explicitly. Read onto the following section.
Add Multi-Field Indexes
To set an index to sort people first by age in descending order, then by name in ascending order:
addIndex [["age","desc"],["name","asc"]] people

get people ["age","desc"] ["name"]
Special Operations
WeaveDB has shortcuts for common operations which only work with the SDK and not with the terminal for now.
inc
To increment a number, or add an arbitrary number to a field:
// increment
await db.update({age: db.inc(1)}, "people", "Bob")

// add 10
await db.update({age: db.inc(10)}, "people", "Bob")

// subtract 10
await db.update({age: db.inc(-10)}, "people", "Bob")
union
To add elements to an array:
await db.update({fav_foods: db.union("beef", "milk")}, "people", "Bob")
remove
To remove elements from an array:
await db.update({fav_foods: db.remove("beef", "milk")}, "people", "Bob")
del
To delete a field:
await db.update({age: db.del()}, "people", "Bob")
ts
To set the block timestamp to a field:
await db.update({birthday: db.ts()}, "people", "Bob")
signer
To set the query signer to a field:
await db.update({wallet_address: db.signer()}, "people", "Bob")
Set up Schema
WeaveDB utilizes JSON Schema to validate incoming data.
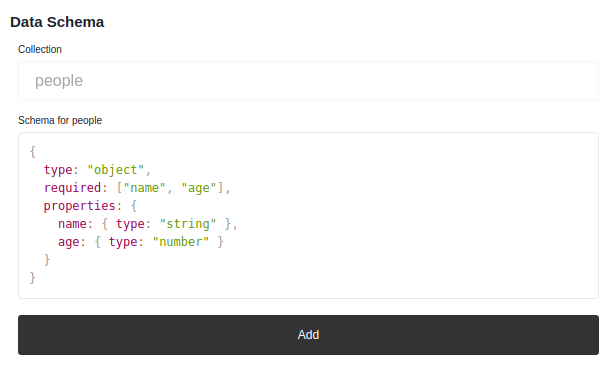
For example, let's set a schema to the people collection.
{
  type: "object",
  required: ["name", "age"],
  properties: {
    name: { type: "string" },
    age: { type: "number" }
  }
}
This means:
- the document must be an
object nameandagefields are requirednamemust bestringagemust benumber
To add the schema, click Schema in the side menu, select people from collection list, then click + in the top right corner of the Schema box.
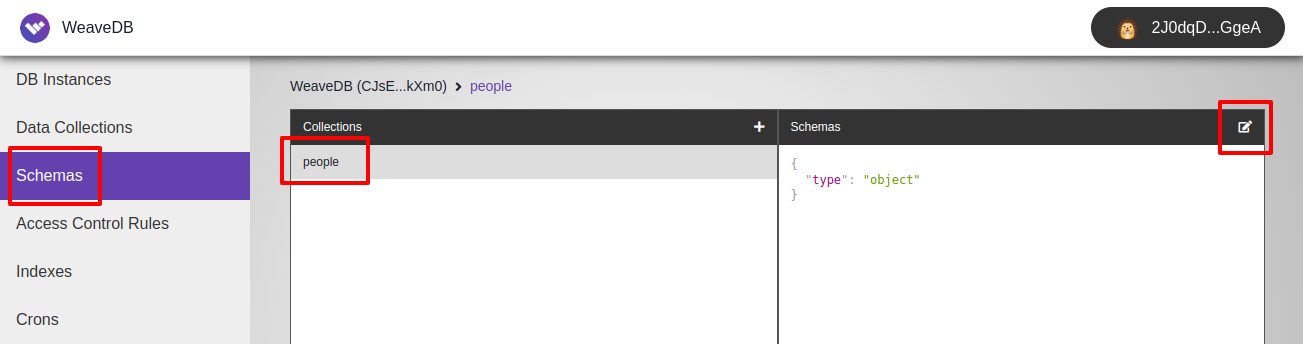
You can copy & paste the schema object above to the popped-up textarea and hit Add.
Now you cannot add a document to people violating the schema, such as:
set {name:123,age:"Bob"} people Bob
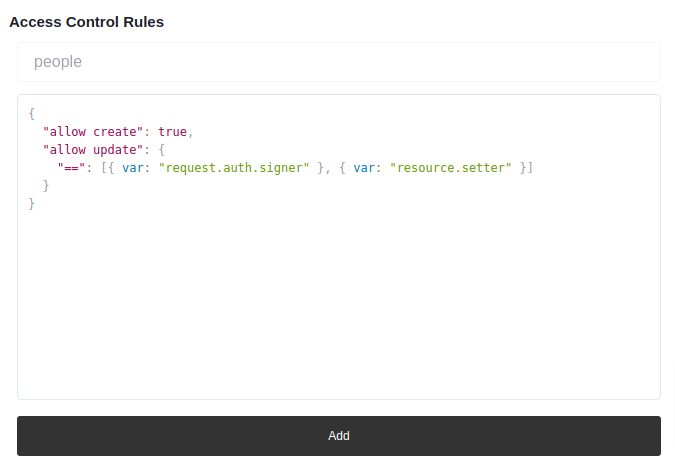
Set up Access Control Rules
With decentralized DBs, it's extremely essential to control who can update what, since it's permissionless by default. WeaveDB has a powerful mechanism to precisely set up any advanced logic to your DB instance by combining JsonLogic and FPJSON.
In this tutorial, we will only explore basic JsonLogic parts.
You can set up rules to either the entire write operation with write or specific operations with create, update and delete.
So write = create + update + delete.
Within the rules, you can access various information about contract, block, transaction, and data to be uploaded.
{
  contract: { id, owners },
  request: {
    method,
    func,
    auth: { signer, relayer, jobID, extra },
    block: { height, timestamp },
    transaction: { id },
    resource: { data },
    id,
    path,
  },
  resource: { data, setter, newData, id, path },
}
And with JsonLogic, you can use var to access variables, such as {var: "resource.newData.user"} to access the user field of the newly updated data.
resource.setter is the data creator. The following ensures only the original data creators can update their own data:
{
  "allow create": true,
  "allow update": {
    "==": [{ var: "request.auth.signer" }, { var: "resource.setter" }]
  }
}
To combine multiple operations, chain them with , like allow create,update.
To add the rules, click Access Control Rules in the side menu, select people from the Collection list, then click the edit icon in the top right corner of the Rules box.
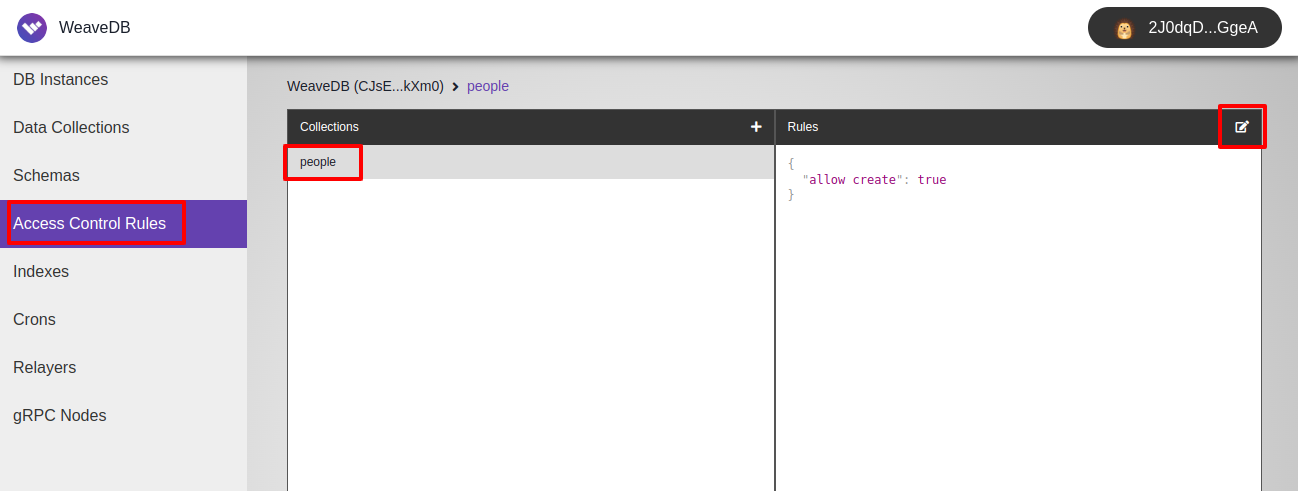
You can copy & paste the rules object above to the popped-up textarea and hit Add.
Now if you try to update an existing data with another wallet, the transaction will fail.
With FPJSON, you can do powerful things such as mutating the updated data and adding extra fields.
Intermediate
Connecting from Frontend
Now, let's connect with the DB instance from a front-end dapp. You need to use weavedb-sdk for that.
To install:
yarn add weavedb-sdk
To use in a front-end dapp:
import SDK from "weavedb-sdk"

const db = new SDK({ contractTxId })
await db.init()

const people = await db.get("people")
Execute Queries
To add a doc with the browser connected Metamask:
const bob = { name: "Bob", age: 20 }

await db.add(bob, "people")
Other wallets can also be authenticated, which includes Arweave, Internet Identity, IntmaxWallet and Lens Profile.
To authenticate a user by generating a disposal address:
const { identity } = await db.createTempAddress()

await db.add(bob, "people", identity)
By generating a disposal address, dapp users won't be asked for a signature with a wallet popup every time they are to send a transaction. The disposal key stored in browser storage will auto-sign transactions.
Example with NextJS
Let's build the simplest dapp to connect with WeaveDB from the client-side with NextJS. Make sure you have yarn and create-next-app installed.
yarn create next-app
cd my-app
yarn add weavedb-sdk
yarn dev
Now you have a local app running at localhost:3000.
Replace /page/index.js with the following. Styles for UI are intentionally omitted for simplicity.
import { useState, useEffect } from "react"
import SDK from "weavedb-sdk"
let db

export default function Home() {
  const [user, setUser] = useState(null)
  const [txid, setTxId] = useState(null)

  useEffect(() => {
    ;(async () => {
      db = await new SDK({
        contractTxId: "YOUR_CONTRACT_TX_ID",
      })
      await db.init()
      try {
        console.log(await db.db.readState())
        console.log(await db.getNonce("abc"))
      } catch (e) {}
    })()
  }, [])

  return (
    <div
      style={{
        display: "flex",
        height: "100vh",
        alignItems: "center",
        justifyContent: "center",
      }}
    >
      {user === null ? ( // show Login button if user doesn't exist
        <button
          onClick={async () => {
            // generate a disposal address
            const { identity } = await db.createTempAddress()
            // and set the identity to user
            setUser(identity)
          }}
        >
          Login
        </button>
      ) : txid === null ? (
        <button
          onClick={async () => {
            // WeaveDB will immediately return the result using virtual state
            const tx = await db.set(
              { name: "Beth", age: 50 },
              "people",
              "Beth",
              {
                ...user,
                onDryWrite: {
                  read: [
                    // you can execute instant read queries right after dryWrite
                    ["get", "people", "Beth"],
                    ["get", "people"],
                  ],
                },
              }
            )
            // the dryWrite result will be returned instantly (10-20ms)
            console.log(tx)

            // to get the actual tx result, use getResult. This will take 3 secs.
            const result = await tx.getResult()
            console.log(result)
            // set the transaction id to txid
            setTxId(result.originalTxId)
          }}
        >
          Add Beth
        </button>
      ) : (
        // show a link to the transaction record
        <a
          href={`https://sonar.warp.cc/#/app/interaction/${txid}`}
          target="_blank"
        >
          {txid}
        </a>
      )}
    </div>
  )
}
The WeaveDB SDK keeps a virtual state locally and immediately returns a result (dryWrite) without sending the transaction first, which takes only around 10ms. If you need to get the actual transaction result, you can use getResult, which takes around 3-4 seconds.
You can also pack any number of dryRead queries with onDryWrite.read to immediately execute on the result of the dryWrite.
For a great UX, dapps would utilize dryWrite/dryRead, which, in most cases, takes less than 50ms, whereas the equivalent tx without dryWrite could take 4-5 seconds.
The WeaveDB dryWrite with a virtual state is faster than the WarpSDK dryWrite which requires an http call to sync with the latest state. But it might give you a different result from the actual finality. If there is any discrepancy, it will be solved in 5 seconds. But handle the dryWrite results with care.
The SDK needs to be initialized with an Arweave wallet to send transactions to Arweave, but for now you don't have to pay for any transactions. So you can initialize it with a randomly generated wallet with init.
You can view the sample code here.
Authentication
User authentication on WeaveDB is purely done by cryptography without any centralized components.
There are 5 wallet integrations at the moment, which includes:
- Metamask (EVM) -
secp256k1 - Internet Identity (Dfinity) -
ed25519 - ArConnect (Arweave) -
rsa256 - IntmaxWallet (Intmax zkRollup) -
secp256k1-2|poseidon - Lens Profile (Lens Protocol) -
secp256k1-2

We will use only EVM, Arweave and Lens for this tutorial.
Set Auth Algorithms
You can enable/disable authentication by setting required algorithms listed above.
secp256k1 is for EIP712 typed structured data signatures and secp256k1-2 is for regular EIP191 signatures used in Lit Action.
For example, to enable only EVM, Arweave and Lens.
setAlgorithms ["secp256k1","rsa256","secp256k1-2"]
Lens Protocol Profiles
Lens Profiles are Polygon NFTs, which requires a different way to securely verify them across chains. WeaveDB utilizes Lit Protocol to validate ownerships of Lens Profiles in a decentralized and verifiable fashion.
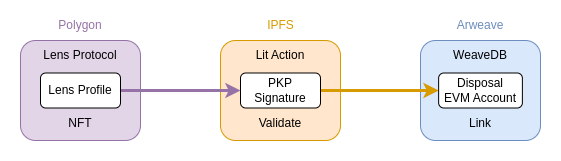
The Lit Action is an immutable script stored in IPFS, which validates ownerships of Lens Profiles and signs WeaveDB queries with a PKP (Programmable Key Pair). The privateKeys of PKPs are decentralized by threshold cryptography and controlled by NFT to grant access to Lit Action scripts, but we use the Mint/Grant/Burn technique to immediately abandon the ownership after granting access to only one IPFS address, so the PKP(0xF810D4a6F0118E6a6a86A9FBa0dd9EA669e1CC2E) associated with the IPFS script can only produce signatures within that script.
So any queries signed by the PKP are guaranteed to be validated through the immutable IPFS script of Lit Action, which securely bridges data from Polygon to WeaveDB (Arweave). WeaveDB verifies the PKP signature and links the verified Lens Profile to a disposal EVM address, so the user doesn't have to repeat this authentication process again.
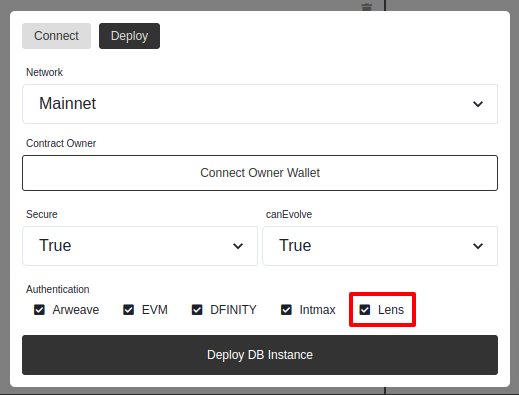
To enable the Lens authentication, you need to set up a relayer job (auth:lens) so the Lit Action can function as a WeaveDB relayer. But the whole setup is taken care of by Web Console, if you leave the Lens check marked when deploying your contract.
Generating Disposal Key Pair
For optimal UX for dapp users, you would want to generate a disposal key pair and let it auto-sign transactions without wallet pop-ups every time they are to update data.
We will explore the disposal key flow, but for any other usages, refer to the Authentication document.
// with Metamask
const { tx, identity } = await db.createTempAddress()

// with ArConnect
const { tx, identity } = await db.createTempAddressWithAR()

// with Lens Profile
const { tx, identity } = await db.createTempAddressWithLens()
You can also set an expiry date to disposal keys.
const expiry = 60 * 60 * 24 * 3 // 3 days

// with Metamask, the first argument is to manually set the wallet
const { tx, identity } = await db.createTempAddress(null, expiry)

// with ArConnect
const { tx, identity } = await db.createTempAddressWithAR(null, expiry)

// with Lens Profile
const { tx, identity } = await db.createTempAddressWithLens(expiry)
The identity object.
const identity = {
  privateKey, // the disposal account privKey
  publicKey, // the disposal account pubKey
  address, // the disposal account address
  linkedAccount, // the original account address, `lens:123` for lens
  signer, // the generator of the identity, same as linkedAddress except for lens
  type, // evm | ar | ii | intmax | lens
  profile // only for Lens, e.g.) `identity.profile.handle` to get handle
}
To execute queries, set the identity as the last argument to any write query.
await db.set(data, "people", "Bob", identity)
await db.delete(data, "people", "Bob", identity)
Using Signer in Access Control Rules
As explained earlier, you can access the signer (request.auth.signer) in access control rules.
The signer will be the original address(identity.linkedAccount) and not the disposal EVM address(identity.address).
And for Lens Profile, the format is lens:[tokenID]. So if your tokenID is 123, you will get lens:123 as the signer.
The following rules ensure that the uploader's wallet address(request.auth.signer) is set to user field of the updated data(resource.newData.user) on create, and the uploader's wallet address(request.auth.signer) equals to the existing user field(resource.data.user) on update.
resource.newData is the data after the query is applied, and resource.data is the existing data before the query is applied.
{
  "allow create": { // signer must be set to `user` field
    "==": [{ var: "request.auth.signer" }, { var: "resource.newData.user" }]
  },
  "allow update": { // signer must be the same as `user`
    "==": [{ var: "request.auth.signer" }, { var: "resource.data.user" }]
  }
}
By using let you can mutate or add extra data to the updated data.
For example, the following assigns the signer to user field of the updated data on create.
{
  "let create": { // assign signer to `user`
    "resource.newData.user" : { var: "request.auth.signer" }
  }
}
Example with NextJS
Set the following access control rules to users collection using the Web Console.
{
  "let create": {
    "resource.newData.user" : { var: "request.auth.signer" }
  },
  "allow create": { // signer must be set to `user` field
    "==": [{ var: "request.auth.signer" }, { var: "resource.newData.user" }]
  },
  "allow update": { // signer must be the same as `user`
    "==": [{ var: "request.auth.signer" }, { var: "resource.data.user" }]
  }
}
Frontend code.
import { useState, useEffect } from "react"
import SDK from "weavedb-sdk"
import lf from "localforage" // to store user in indexedDB for persistence

let db
export default function Home() {
  const [user, setUser] = useState(null)
  const [users, setUsers] = useState([])

  useEffect(() => {
    ;(async () => {
      // check if an authenticated user exists
      setUser((await lf.getItem("identity")) || null)

      // initialize SDK
      const _db = await new SDK({ contractTxId: "your_contractTxId" })
      await _db.init()

      // fetch all users
      setUsers(await _db.get("users"))

      db = _db
    })()
  }, [])

  // on creating a disposal key pair
  const regUser = async ({ tx, identity }) => {
    if (!tx.success) return

    // set user
    setUser(identity)

    // store user for persistence between page reload
    await lf.setItem("identity", identity)

    // also save user to WeaveDB, the access control rules fill user address
    await db.set(
      { type: identity.type },
      "users",
      identity.linkedAccount,
      identity
    )
  }

  return (
    <>
      {user === null ? (
        <>
          <div onClick={async () => regUser(await db.createTempAddress())}>
            Login with Metamask
          </div>
          <div
            onClick={async () => regUser(await db.createTempAddressWithAR())}
          >
            Login with Arweave
          </div>
          <div
            onClick={async () => regUser(await db.createTempAddressWithLens())}
          >
            Login with Lens Profile
          </div>
        </>
      ) : (
        <div
          onClick={async () => {
            // unset user
            setUser(null)

            // remove locally stored user
            await lf.removeItem("identity")
          }}
        >
          Logout ({user.linkedAccount})
        </div>
      )}
      <hr />
      {users.map(v => { // render all users
        return (
          <div>
            {v.type}: {v.user}
          </div>
        )
      })}
    </>
  )
}
Advanced
Building Lens Dapp
Let's build an actual dapp, utilizing what you learned in this tutorial so far.
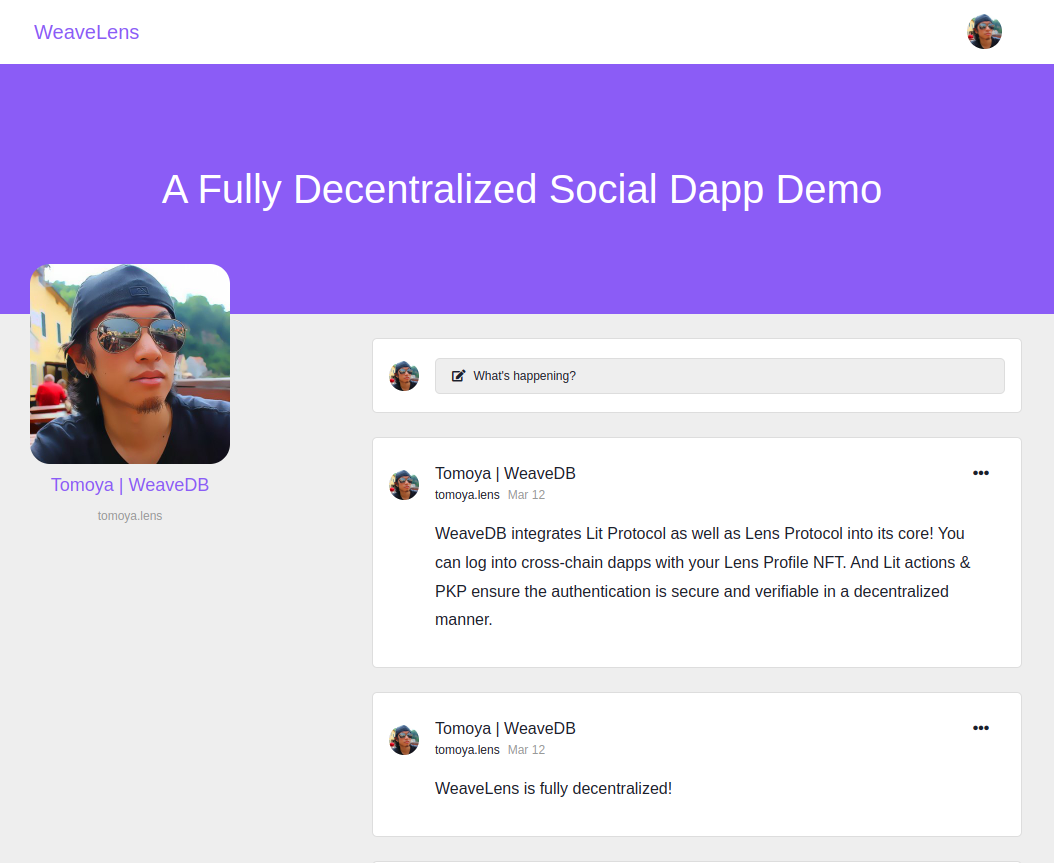
We are going to build a simple Twitter-like dapp using Lens Profile.
You can try the working demo at relayer-lens-lit.vercel.app.
1. Deploy DB Instance
The first step is to deploy a WeaveDB contract to the mainnet. Set Secure to true so no one can update by default. Take note of the contractTxId.
2. Set up Schemas
For this dapp, we will define 2 collections - users and posts. For example, the following is how we want the data to be.
const user = {
  name: "Tomoya | WeaveDB",
  uid: "lens:97912",
  handle: "tomoya.lens",
  image: "https://cloudflare-ipfs.com/ipfs/QmU51aQqJb6rwsjTYbUodMWRLJUVimdrHKcWwZARXVajzP"
}

const post = {
  id: "YeIXjVbsUqHL4SYl0tW-I",
  body: "WeaveLens is fully decentralized!",
  user: "lens:97912",
  date: 1678587066647
}
The JSON schema for each collection would be something like the following.
// for users, note `image` is not required
{
  "type": "object",
  "required": [ "name", "uid", "handle" ],
  "properties": {
    "name": { "type": "string" },
    "uid": { "type": "string" },
    "handle": { "type": "string" },
    "image": { "type": "string" }
  }
}

// for posts
{
  "type": "object",
  "required": [ "user", "body", "date", "id" ],
  "properties": {
    "id": { "type": "string" },
    "body": { "type": "string" },
    "user": { "type": "string" },
    "date": { "type": "number" }
  }
}
Set these up using the Web Console.
3. Set up Access Control Rules
For users, we want the docid to be the same as uid and users can only update their own data.
{
  "allow create": {
    "and": [
      // docid must be the same as uid
      { "==": [{ "var": "request.id" }, { "var": "resource.newData.uid" }] },

      // uid must be the same as signer
      { "==": [{ "var": "resource.newData.uid" }, { "var": "request.auth.signer" }] }
    ]
  },
  "allow update": {
    "and": [
      // docid must be the same as uid
      { "==": [{ "var": "request.id" }, { "var": "resource.newData.uid" }] },

      // uid must be the same as signer
      { "==": [{ "var": "resource.data.uid" }, { "var": "request.auth.signer" }] },

      // uid cannot be updated
      { "==": [{ "var": "resource.data.uid" }, { "var": "resource.newData.uid" }] },

      // handle cannot be updated
      { "==": [{ "var": "resource.data.handle" }, { "var": "resource.newData.handle" }] }
    ]
  }
}
For posts, we want the docid to be in the format of [user]:[id], and users can only delete their own posts.
{
  "let create": { // define `id` variable to use later
    id: [ "join", ":", [{ var: "resource.newData.user" }, { var: "resource.newData.id" }] ]
  },
  "allow create": {
    and: [
      // the signer must be `user`
      { "==": [{ var: "resource.newData.user" }, { var: "request.auth.signer" }] },

      // the docid must be the same as the predefined `id`
      { "==": [{ var: "request.id" }, { var: "id" }] }
    ]
  },
  "allow delete": { // the signer must be `user`
    "==": [{ var: "request.auth.signer" }, { var: "resource.data.user" }]
  }
}
Set these up using the Web Console.
4. Frontend Dapp
You can view the entire frontend code here.
To run it,
git clone https://github.com/weavedb/weavedb.git
cd weavedb/examples/relayer-lens-lit
yarn
Create .env.local and set your contractTxId to NEXT_PUBLIC_WEAVEDB_CONTRACT_TX_ID.
NEXT_PUBLIC_WEAVEDB_CONTRACT_TX_ID="your_contractTxId"
Then,
yarn dev
Going Further
WeaveDB is extremely powerful if you get familiar with advanced usages.
- FPJSON to build advanced logic
- Cron Jobs to periodically update data
- Contract management / Upgradability
- Verifiable relayers to process external data
- Cross-chain data bridge with Lit Protocol
- Using gRPC node for performance boost