Custom Authentication
Custom authentication methods can be added in the same way Lens Profile authentication is built in.
In this example, we will demonstrate how you can set up a custom authentication method using the Lens Profile NFT on the Polygon mainnet. Users will be recognized by their NFT tokenIDs instead of their wallet addresses. In this way, if a Lens Profile NFT is transferred to a different address, the entire WeaveDB data associated with the NFT will also be automatically inherited by the new owner.
The Lens Profile authentication method is already built-in with WeaveDB and you can execute the authentication with one simple SDK function await db.createTempAddressWithLens(). But this demo shows how you can implement your own authentication method in the same way.
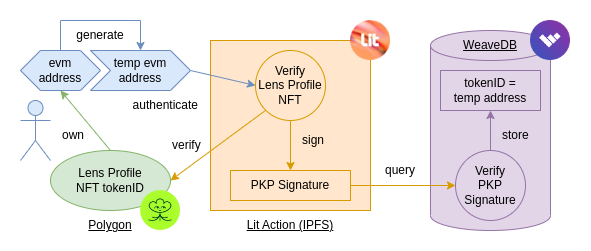
- The user owns a Lit Profile NFT (tokenID).
- A temp evm address is generated before authentication.
- The Lit Action will be executed, which verifies the ownership of the NFT, and signs with a PKP.
- WeaveDB verifies the PKP signature and links the temp address with the tokenID.
The Lit Action is an immutable script stored on IPFS, and the PKP can only sign in that script, which means as long as the PKP signature is valid, the ownership of the Lens Profile is guaranteed by this verifiable flow. This is how WeaveDB can securely use data from outside sources by using Lit Actions as oracles.
The temp address is a disposal key pair stored on the local device to auto-sign transactions. So now the temp address can auto-sign and act on behalf of the tokenID owner without forcing the user to sign every transaction with wallet pop-ups.
1. Deploy Contract
Deploy a WeaveDB contract using the Web Console, and get the contractTxId.
2. Write Lit Action Script
Let's name the custom authentication flow custom (it can be anything).
const go = async () => {
  const tokenID = params.query.linkTo.split(":")[1]
  const address = params.caller
  const EIP712Domain = [
    { name: "name", type: "string" },
    { name: "version", type: "string" },
    { name: "verifyingContract", type: "string" },
  ]
  const query = {
    func: "relay",
    query: [
      typeof jobID === "undefined" ? "auth:custom" : jobID,
      params,
      { linkTo: "custom:" + tokenID },
    ],
  }
  const message = {
    nonce,
    query: JSON.stringify(query),
  }
  const data = {
    types: {
      EIP712Domain,
      Query: [
        { name: "query", type: "string" },
        { name: "nonce", type: "uint256" },
      ],
    },
    domain: {
      name: typeof name === "undefined" ? "weavedb" : name,
      version: typeof version === "undefined" ? "1" : version,
      verifyingContract: contractTxId,
    },
    primaryType: "Query",
    message,
  }
  const conditions = [
    {
      contractAddress: "0xDb46d1Dc155634FbC732f92E853b10B288AD5a1d",
      standardContractType: "ERC721",
      chain: "polygon",
      method: "ownerOf",
      parameters: [tokenID],
      returnValueTest: {
        comparator: "=",
        value: address,
      },
    },
  ]
  if (
    !(await Lit.Actions.checkConditions({
      conditions,
      authSig,
      chain: "polygon",
    }))
  ) {
    return
  }
  const sigShare = await LitActions.ethPersonalSignMessageEcdsa({
    message: JSON.stringify(data),
    publicKey,
    sigName: "sig1",
  })
}

go()
Upload the js file above to IPFS and get the CID. You could, for example, use Pinata and they will be immediately available through the Cloudflare gateway.
3. Mint/Grant/Burn PKP
Mint/Grant/Burn a PKP on Chronicle testnet using the script below. You need to get some testnet LIT token through the official faucet.
const bs58 = require("bs58")
const { Wallet, Contract, ethers } = require("ethers")
const privatekey = "ANY_EVM_PRIVATE_KEY" // this could be any account since the NFT will be immediately burnt
const ipfsCid = "YOUR_IPFS_CID"

const abi = [
  {
    inputs: [
      {
        internalType: "uint256",
        name: "keyType",
        type: "uint256",
      },
      {
        internalType: "bytes",
        name: "ipfsCID",
        type: "bytes",
      },
    ],
    name: "mintGrantAndBurnNext",
    outputs: [
      {
        internalType: "uint256",
        name: "",
        type: "uint256",
      },
    ],
    stateMutability: "payable",
    type: "function",
  },
]

function getBytesFromMultihash(multihash) {
  const decoded = bs58.decode(multihash)
  return `0x${Buffer.from(decoded).toString("hex")}`
}

const go = async () => {
  const provider = new ethers.JsonRpcProvider(
    "https://chain-rpc.litprotocol.com/http"
  )

  const wallet = new Wallet(privatekey, provider)
  const contract = new Contract(
    "0x8F75a53F65e31DD0D2e40d0827becAaE2299D111",
    abi,
    wallet
  )

  const tx = await contract.mintGrantAndBurnNext(
    2,
    getBytesFromMultihash(ipfsCid),
    { value: "1" }
  )
  console.log(await tx.wait())
}

go()
PKP script
You can also run the sample script from the repo. Just replace your own values for privatekey and ipfsCid in custom-auth-pkp.js
Run the script using the terminal commands shown below.
cd examples/custom-auth/pkp-script
yarn
node custom-auth-pkp.js
Go to the Chronicle Explorer and check the PKP NFT contract
Use the given hash or your wallet address to find your most recent transaction on the explorer. When you click on the equivalent transaction, the newly minted and burned tokenID will show up.
Now go to the PKP page on the Lit Explorer https://explorer.litprotocol.com/pkps/[tokenID], and get the PKP Public Key and the ETH Address.
4. Add RelayerJob
Add a relayer job for the authentication method. You can use the web console or CLI.
Web Console
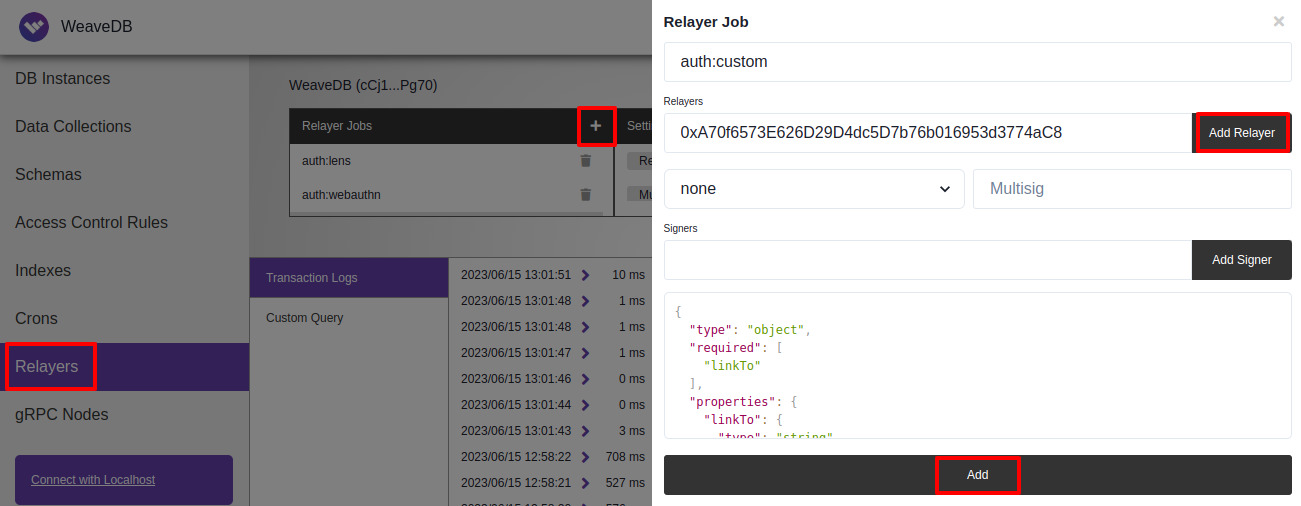
Fill in the relayers input field with the ETH Address that you had previously obtained from https://explorer.litprotocol.com/pkps/\[tokenID\]
Set the following schema for extra data
{
   relayers: ["PKP_Address"],
   schema: {
     type: "object",
     required: ["linkTo"],
     properties: {
       linkTo: {
         type: "string",
       },
     },
   },
 }
CLI
const job = {
   relayers: ["PKP_Address"],
   schema: {
     type: "object",
     required: ["linkTo"],
     properties: {
       linkTo: {
         type: "string",
       },
     },
   },
 }
await db.addRelayerJob("auth:custom", job)
5. Authenticate Users
Let's build a simple app using NextJS.
npx create-next-app custom-auth
cd custom-auth
yarn add @lit-protocol/lit-node-client ethers weavedb-sdk
yarn dev
Now the default app is running at localhost:3000.
Create .env.local file with the following variables.
NEXT_PUBLIC_CONTRACT_TX_ID=""
NEXT_PUBLIC_PKP_ADDRESS=""
NEXT_PUBLIC_PKP_PUBLIC_KEY=""
NEXT_PUBLIC_IPFS_ID=""
NEXT_PUBLIC_AUTH_NAME="custom"
NEXT_PUBLIC_CONTRACT_TX_ID- contractTxId when you deployed the WeaveDB contract.NEXT_PUBLIC_PKP_ADDRESS- ETH Address that you had previously obtained from https://explorer.litprotocol.com/pkps/\[tokenID\]NEXT_PUBLIC_PKP_PUBLIC_KEY- PKP Public Key that you had previously obtained from https://explorer.litprotocol.com/pkps/\[tokenID\]NEXT_PUBLIC_IPFS_ID- IPFS content identifier obtained from Pinata.
Then update /pages/index.js with the following code.
import SDK from "weavedb-sdk"
import { useEffect, useState } from "react"
import { Signature, BrowserProvider } from "ethers"
import * as LitJsSdk from "@lit-protocol/lit-node-client"

const contractTxId = process.env.NEXT_PUBLIC_CONTRACT_TX_ID
const pkp_address = process.env.NEXT_PUBLIC_PKP_ADDRESS
const publicKey = process.env.NEXT_PUBLIC_PKP_PUBLIC_KEY
const ipfsId = process.env.NEXT_PUBLIC_IPFS_ID
const auth_name = process.env.NEXT_PUBLIC_AUTH_NAME

let db
export default function Home() {
  const [user, setUser] = useState(null)
  const [tokenID, setTokenID] = useState("")

  useEffect(() => {
    ;(async () => {
      db = new SDK({ contractTxId })
      await db.init()
    })()
  }, [])

  return (
    <div
      style={{
        display: "flex",
        height: "100vh",
        alignItems: "center",
        justifyContent: "center",
      }}
    >
      {user === null ? (
        <>
          <input
            placeholder="Lens Profile TokenID"
            value={tokenID}
            onChange={(e) => setTokenID(e.target.value)}
          />
          <button
            onClick={async () => {
              const provider = new BrowserProvider(window.ethereum)
              const signer = await provider.getSigner()
              let { identity, tx: params } = await db._createTempAddress(
                (await signer.getAddress()).toLowerCase(),
                null,
                `${auth_name}:${tokenID}`,
                {
                  evm: signer,
                  relay: true,
                  jobID: `auth:${auth_name}`,
                },
                "custom"
              )
              const litNodeClient = new LitJsSdk.LitNodeClient({
                litNetwork: "serrano",
              })
              await litNodeClient.connect()
              const authSig = await LitJsSdk.checkAndSignAuthMessage({
                chain: "ethereum",
              })
              const nonce = 1
              let _res
              try {
                _res = await litNodeClient.executeJs({
                  ipfsId,
                  authSig,
                  jsParams: {
                    nonce,
                    params,
                    authSig,
                    contractTxId,
                    publicKey,
                  },
                })
              } catch (e) {
                console.error("safasdfsdf", e)
              }

              const _sig = _res.signatures.sig1
              if (typeof _sig === "undefined") {
                alert("The wrong Lens Profile TokenID")
              } else {
                const signature = Signature.from({
                  r: "0x" + _sig.r,
                  s: "0x" + _sig.s,
                  v: _sig.recid,
                }).serialized
                const relay_params = {
                  function: "relay",
                  query: [
                    `auth:${auth_name}`,
                    params,
                    { linkTo: params.query.linkTo },
                  ],
                  signature,
                  nonce,
                  caller: pkp_address,
                  type: "secp256k1-2",
                }
                const tx = await db.write("relay", relay_params)
                setUser(identity)
              }
            }}
          >
            Login
          </button>
        </>
      ) : (
        user.linkedAccount
      )}
    </div>
  )
}
You can view the entire code here.